How to Improve Your Drawing – 30 Practical Drawing Tips
If you are reading this post, then you probably want to improve your drawing. The good news is, it’s a skill that you can learn, like any other.
Drawing is a great hobby and one that many people enjoy, however it can be rewarding and frustrating in equal measure.
People looking to improve their drawing are often told that it’s just about practice – ‘practice, practice, PRACTICE’!
In a way that is true, but it’s also about what you do during that practice.
To help all budding artists out there, we have compiled a list of 30 things you can do to help improve your drawing.
You don’t have to try them all, but if you adopt at least 5 or 6 we bet you will quickly see an improvement – meaning more reward and less frustration!
Tip 1 – Draw every day
It’s easier than you think and above all else this will bring improvements in your drawing.
Have a stack of photo references or still life objects to hand and pull one out at random.
You only need to draw for 5 or 10 minutes every day for a couple of weeks to see some benefit.
Set the same time aside each day if possible, so you easily get into a routine.
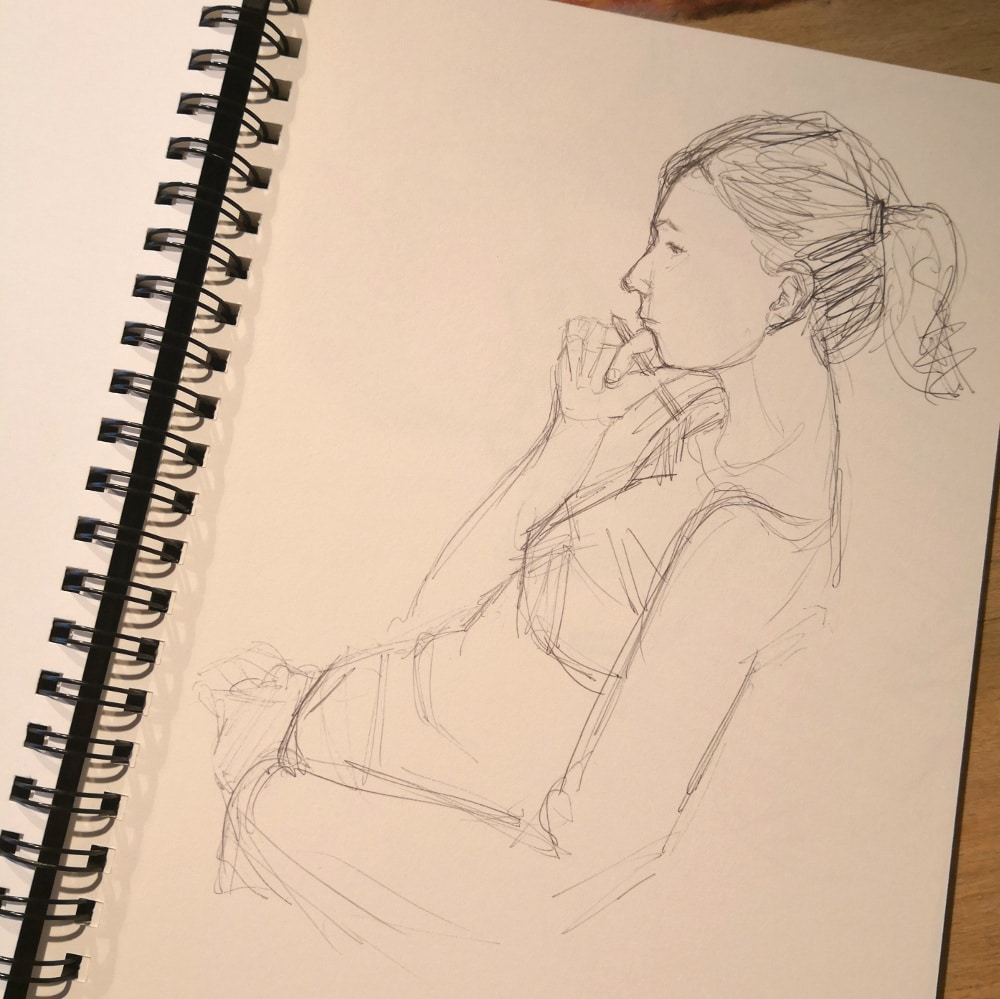
Tip 2 – Always carry a sketchbook and pen – and use them!
This will also help you with Tip 1.
It doesn’t need to be a fancy sketchbook, just a small, unlined notebook will do. You should also carry a biro or HB pencil.
The objective is to improve your observation skills, rather than to create amazing, finished drawings. This can be your private sketchbook, that you don’t share with anyone.
When you have a few empty minutes, pull out your notepad and draw whatever you see.
It could be a coffee cup, a train station, the person sitting opposite you – anything!
After doing this for 2 weeks you will almost certainly see an improvement in your drawing.

Improve your drawing – carry a notebook and pen with you and draw whatever is in front of you
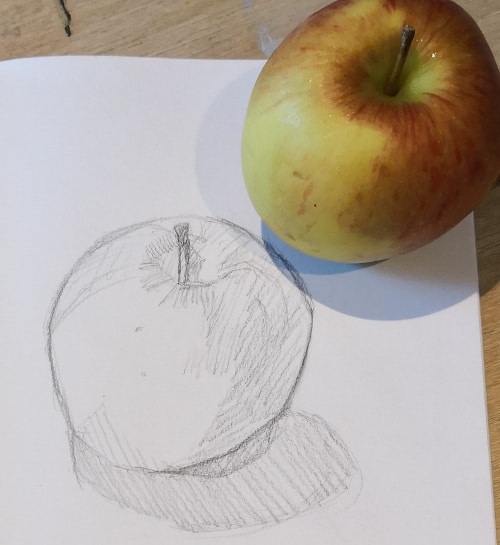
Tip 3 – Start simple
We would all love to draw like Michelangelo, but if you set this as your day one goal, the chances are you are setting yourself up for a lot of frustration.
Start off with small, simple subjects that you only need to use a few lines to draw, and build up over time to more complex subject matter.
For example, you could draw an apple or pear, progress to an arrangement of 3 apples or pears, then on to a full fruit bowl.
Improve your drawing – 30 practical tips to improve your drawing skills
Tip 4 – Draw the same thing again and again
Sounds dull? Well, maybe a bit.
But it will give you a vital opportunity to hone your basic skill before moving on to more complex drawings.
You could pick a subject which has ‘shapes’ that are found a lot in the environment.
For example coffee mugs, which are largely made up of straight lines and circles.
This means that when you go on to draw other, similar subjects, you have already acquired some of the skill.
Or if you have a particular drawing passion, such as portraits, concentrate on a small area of this subject matter for a week or so at a time – like eyes or noses.
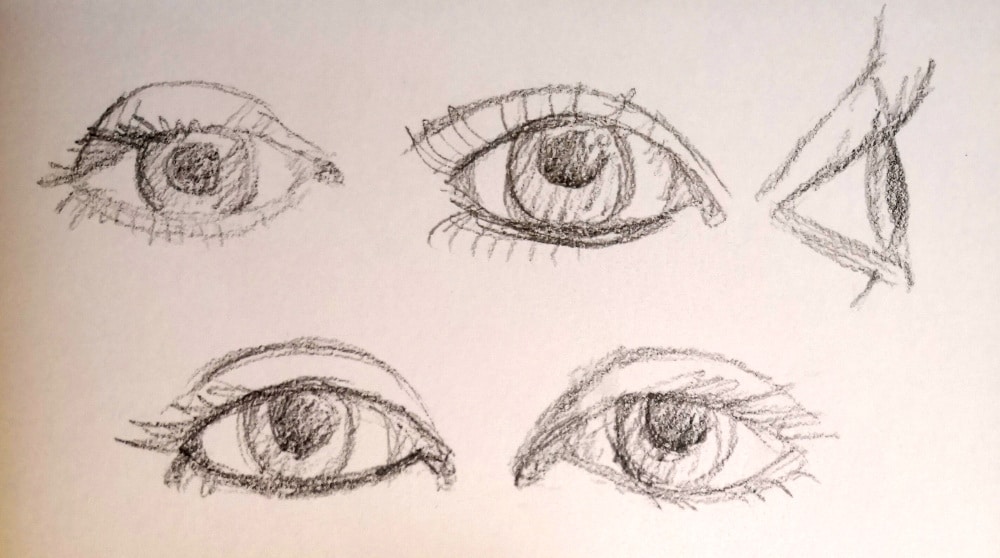
Improve your drawing – focus on the same subject for a period of time until you’re happy with what you’re producing
Tip 5 – Look at your drawings in a mirror
This is a great tip for paintings as well as drawings.
It’s easy to get so absorbed in your work that you lose perspective.
By removing yourself from the artwork by reflecting back its mirror image, mistakes will leap out at you.
You can then make any adjustments you need.
(If you don’t have a mirror to hand, take a photo on your phone – it will have the same effect.)
Tip 6 – Use straight lines to draw curved shapes
Getting the curve of an object right can mean the difference between a good drawing and a failed drawing.
Unfortunately, it is very difficult to draw accurate curves freehand.
The good news is, you don’t have to.
By breaking a curve or circle down into a series of short lines, you will find it much easier to replicate what you see on paper.
Practice this regularly and it will become second nature.
Result? Improved drawings!
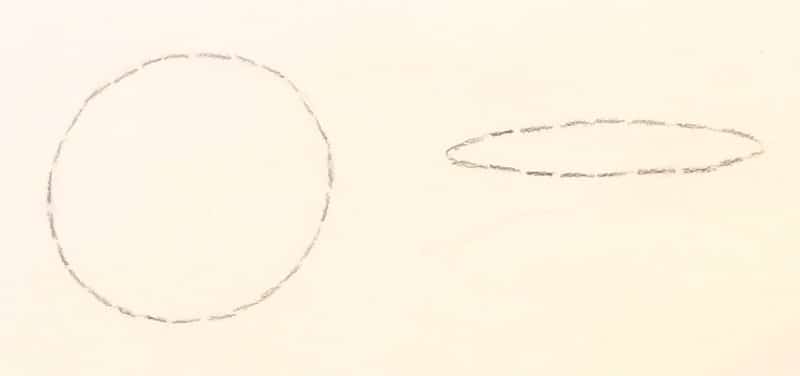
Improve your drawing – make curves easier to draw by breaking them down into short lines
Tip 7 – Ask a friend
Never be afraid to ask a friend ‘what is wrong with this drawing?’
Often they will instantly point out the thing that is throwing it out, which you have missed.
Even though you’ve been puzzling over it for days!
‘There’s something a bit funny with the mouth’, or ‘that tree doesn’t look right’.
Your friend doesn’t have to be an artist themself, anyone who is happy to help will do.
Tip 8 – Look at how other people do it
There are many fine artists in the world, and a wealth of great drawings available to you.
Study drawings by other artists as often as possible.
Ask yourself ‘how did they achieve that effect?’, ‘how did they get that sense of perspective?’, ‘how did they make that figure so lifelike?’.
It’s important to closely analyse what they have done to create a successful drawing.
Then you can decide which techniques you want to try out in your own work.
Tip 9 – Copy other drawings
A great way to improve your own drawing is to copy other, successful drawings.
In a way a lot of the hard work has been done for you.
By that I mean that a 3D real-world image has already been turned into a 2D image.
It also gives you the opportunity to try out new techniques which can result in vastly improved drawings.
NOTE: Please bear in mind that an artist owns the copyright to their drawings. Normally you shouldn’t copy someone else’s work, but if it’s just for your own practice purposes and stays in your notepad then that is fine.
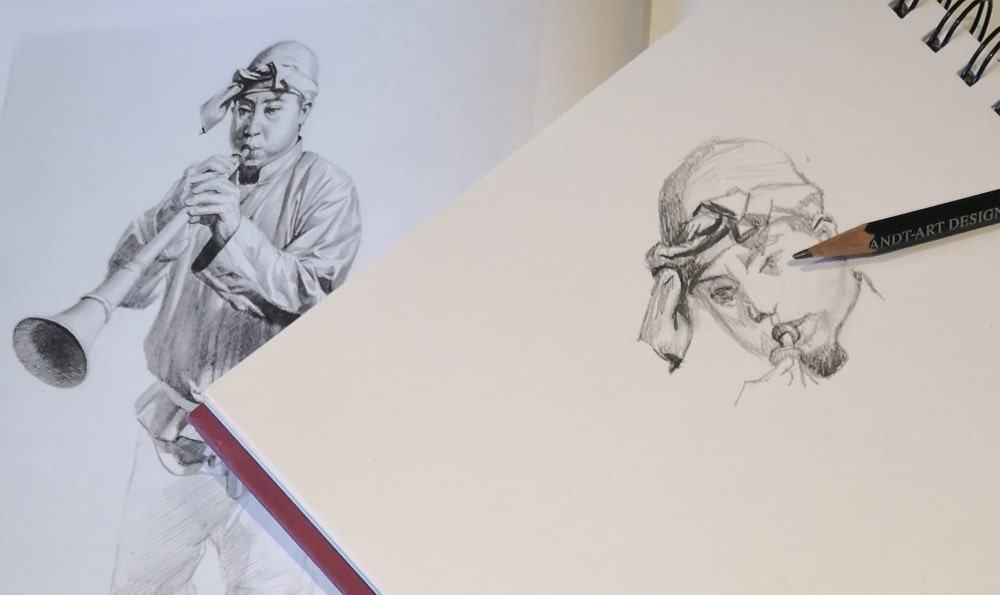
Improve your drawing – copy other people’s successful drawings to improve your technique
Tip 10 – Draw from life
The next step on from copying a drawing is drawing from life.
In our opinion, drawing from life is the quickest way to improve as an artist.
You will be able to see much more of the thing you are trying to represent.
You will also really task your brain with the intellectual challenge of capturing a 3D object as a 2D image.
If you can get to a life-drawing class – where you draw from a nude model – even better.
There are so many subtleties and complexities with the human form – and of course every body is different – it is the ultimate drawing challenge.
Tip 11 – Draw from imagination
Drawing from memory and imagination is a great way to engage your creative brain.
It forces you to really think about what your subject looks like.
It also means you can draw fantastical creatures and scenes which don’t exist in real-life, which can be great fun.
Tip 12 – Experiment
This is so important for all artists.
At the end of the day, drawing is a creative process. If you get stuck in a routine, your drawings will suffer.
Use different materials, pick different subjects, set time limits for yourself. If you usually work small, go large or vice versa – whatever!
Just make sure that every few days you are trying something completely new. You’ll be surprised at how much you learn.
Tip 13 – Take a class
Sometimes there is no substitute for good, old-fashioned classroom teaching.
If you are struggling to get where you want on your own, consider signing up for a class or course.
Not only will you get the benefit of time with an expert tutor, you will also be working alongside people in exactly the same boat as you – which in itself is an excellent opportunity to learn.
Tip 14 – Do lots of 5 minute sketches
It’s easy to fall into the trap of working and re-working a drawing, sometimes for hours at a time.
The trouble with this is that you will lose a lot of the fluidity of the line – something common to many great drawings.
To force yourself to rely on your instinct more, sit down and do a series of 5 minute sketches every so often.
This will stop you getting ‘fussy’ and overthinking things.
Draw a different subject every time so you are really using your brain to find the ‘essence’ of the object as you transfer it to paper.
Improve your drawing – dash off a few 5 minute sketches to tune in your drawing intuition
Tip 15 – Start with the ‘Big Picture’
It can be frustrating to get halfway through a drawing and discover that the proportions are all wrong.
One way to avoid this is to lightly sketch out the ‘big picture’ before you start adding in the detail.
That way you can check that all of your relationships are correct, and that the composition as a whole works.
Tip 16 – Learn how to engage the right side of your brain
The right side of your brain is the creative, artistic, intuitive side and you should try to make good friends with it if you want to improve your drawing.
Unfortunately most of us have an over-developed left hemisphere which just loves to interfere with the artistic process!
That is why drawing can sometimes feel so difficult.
You know that feeling of waking up from a trance and in front of you is an almost completed drawing? That is your right brain taking over.
By doing a few simple exercises regularly you can soon learn how to engage the right side of your brain and create more beautiful and accurate drawings.
Tip 17 – Listen to music while you draw
Listening to music while you’re drawing can help you to ‘tune in’ your right brain’s hemisphere.
The music you pick doesn’t really matter but it shouldn’t be turned up too loud or have too many sudden noises that could break your right brain ‘trance’.
The gentler ends of classical music or electronic dance music can work very well as there are very few breaks in the music, meaning you can just float away…
Tip 18 – Draw upside down
Or rather, turn the reference photo or drawing you are using upside down.
This is another right brain tip and helps shut down your ‘rational’ left hand brain by making it harder to understand the image you are drawing.
With an upside down reference, you can just concentrate on the relationships between the lines and the shapes – you’ll be surprised at what good results you can get!
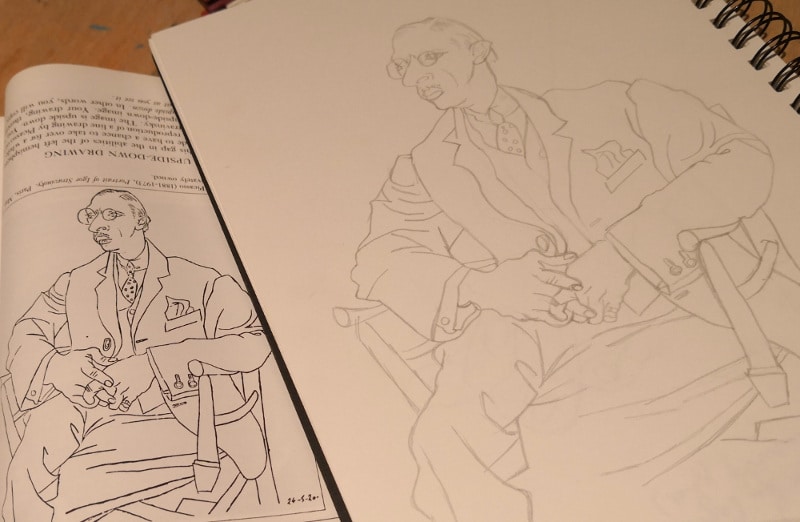
Improve your drawing – copy of a Picasso drawing completed entirely upside down. An exercise from Betty Edwards’ book ‘Drawing on the Right Side of the Brain’
Tip 19 – Learn to draw what you see (and not what you think you see)
The left hand side of the brain likes to tell us we ‘know’ what an apple / vase / face looks like.
However, when you really observe the subject you are drawing, it becomes apparent that very often things aren’t where you ‘think’ they should be.
This is especially true when drawing very foreshortened objects – the left hand side of the brain tries to make what you are seeing more ‘logical’ – resulting in an inaccurate drawing.
It is often said that learning to draw is really learning to see, and that is very true.
When you are drawing you should be looking at your subject at least as often as you are actually drawing.
Try an exercise where you force yourself to only commit a line to paper when you are 100% sure that it is going in the right place.
Over time you will improve your drawing tenfold.
Tip 20 – Draw an abstract shape then try to copy it exactly – 10 times
This is an exercise in observation to help you with Tip 19.
Copying an abstract shape in many ways is the purest form of the drawing process – it is essentially what you are always doing when you draw.
Concentrate on the shapes and random lines you can see within your subject, rather than the subject as a whole.
This is also a great exercise to do before a bigger drawing session to ‘warm up’.
Tip 21 – Change the way you hold your pen
The way you hold a pen for writing is different to the way you should hold a pen for drawing.
When drawing you want your arm movements to be as free as possible.
This means you should draw from the shoulder, and not from the wrist (as you would do if you held your pen as if for writing).
Try holding the pen between 2 fingers near the very end. It will feel a little strange to begin with, but you will soon find there is a lot more expression and fluidity in your drawings.
Tip 22 – Use an easel for drawing
Standing up to draw may seem counter-intuitive but actually brings a couple of big benefits.
Firstly, it will help you draw from the shoulder. As we mentioned in Tip 21, this is important for creating more expressive and fluid lines.
Secondly, it will help you with your perspective because your paper and your reference subject are on the same ‘plane’.
This one requires a little more investment but is really worth trying if you are serious about improving your drawing – it can have a very big impact.
Tip 23 – Try materials you have never used before
More experimentation! Which is so important in any creative endeavour.
You will learn a lot about yourself as an artist if you switch it up from time to time. Such as what you like and dislike, and in effect the ‘tone’ of your artistic ‘voice’.
Changing materials also forces you to use different techniques, which can improve your drawing skills across the board.
So if you’re addicted to pencil, try some charcoal. Or if you love pen and ink, give soft pastel a go.
You may even find something you love more than your previous ‘go to’ medium.
Tip 24 – Do some continuous line drawings
A continuous, or single, line drawing is one where your pen never leaves the page from start to finish.
This method was used by both Pablo Picasso and Auguste Rodin to create dynamic, fluid images.
Doing a few continuous line drawings every so often will train you to look for the essence of the subject, rather than fussing with the details.
It will also help tap into the creative reserves of your right hand brain – always a good thing!
Tip 25 – Look for the shapes within the shape
What do we mean by this?
Well, often when drawing, the natural inclination is to start with the outside line that defines the object.
The difficulty with this is that often it is an extended line, with a lot of white space around it.
That means that, if you focus exclusively on line, there are only a few points of reference you can use and you are more likely to veer off track.
You can prevent this happening by referencing the ‘shapes within the shape’ as you draw.
For example the masses of shadow that are found in the curve of the cheek when drawing a portrait can guide you in creating the shape of the head.
You can even lightly outline these masses if you choose – as a style this can be very effective.
Tip 26 – Use negative space
Another tip for drawing more accurate lines.
If you’re not sure if you’ve got a complex line or junction of lines quite right, have a look at the negative space.
The negative space is the area outside of the object you are drawing.
Really this is another right brain ‘trick’.
By stopping focusing on the ‘logical’ image (left hand brain territory), and focusing on the abstract shapes (right hand brain territory), you will see what you need to draw more clearly.
Try an exercise where you draw a complex subject such as a plant using focusing only on negative space – you might be surprised at the results!
Tip 27 – When all else fails – measure
We’ve all had that experience – a drawing just isn’t working, and you can’t see why.
If you reach that point, start measuring.
After all, drawing is all about accurately capturing the relationships between lines and shapes.
Find a clear feature you can use as a ‘unit’ of measurement – such as the nose in a portrait, or one of the objects in a still life.
Use your fingers or pencil to judge the height of the feature – we’re sure you’ve seen people doing this, even if you haven’t tried it yourself.
You can now use this ‘unit’ to check the relative measurements of the drawing.
Is the distance between the nose and the chin the same in the reference as in your drawing?
Are the other objects in the still life arrangement the correct heights compared to the one you are using as a reference point?
Typically the issue with the drawing will become immediately apparent and you will be able to go ahead and fix what you need to fix.
Tip 28 – Throw away your rubber
Sounds scary? It is! But it can help you improve your drawing no end (yes really).
Learning that not everything you draw needs to be a perfectly executed masterpiece is one of the most important lessons you can learn.
It will help you to be braver, bolder and experiment more – which can only improve your drawing.
Try an exercise where you are not allowed to use a rubber.
If you get a line wrong, don’t worry about it, just draw the right line in. Even if it takes a few attempts – it doesn’t matter!
Drawing is a process and there is a beauty all of its own in seeing that process on the page.
Tip 29 – Pick things to draw that you enjoy drawing
Sounds like a bit of a no-brainer, but in fact it is very easy to get side-tracked into drawing things we don’t enjoy because we feel we ‘should’.
Making art should be enjoyable, or at the very least tap into some raw emotion other than boredom!
So if you can’t bear drawing details, express yourself with some large, free-form nudes.
Or if you love getting into the nitty gritty of technical drawing, focus on urban landscapes.
At the end of the day, this is your artistic practice and should express your vision.
Tip 30 – Read books about drawing
In this age of YouTube and Blogging there is a wealth of information and ideas out there for the budding artist.
The truth is sometimes a good, old-fashioned, ‘textbook’ is what you need.
The advantage of a book over a multitude of individual articles or videos, is that it will step you through a process from A to Z, in a logical way.
Then you can use blogs and YouTube to fill in any gaps, or expand on areas you find particularly interesting.
Two of the best drawing books we have found (although there are many good ones out there) are:
1) Harold Speed’s ‘The Practice and Science of Drawing’ (be warned it’s quite academic, so if you don’t enjoy reading much it may not be for you); and:
2) Betty Edwards’ ‘Drawing on The Right Side of the Brain’.
If you feel there are still a lot of gaps in your drawing practice then maybe give one of these a try.
Happy drawing!